Version upgrade
Table of Contents
Considerations
Upgrading to Zentyal 8.1 must be performed from a fully upgraded Zentyal 8.0. Versions prior to 8.0 must be upgraded progressively. The complete upgrade sequence from Zentyal 3.2 version is as follows:
3.2 -> 4.x -> 5.x -> 5.x -> 6.0 -> 6.1 -> 6.2 -> 7.0 -> 7.1 -> 8.0 -> 8.1
Warning
These instructions are valid for upgrading from version 8.0 Development Edition to 8.1. For a Commercial Edition, you must contact the Support Team. If you do not have access to the Support Portal [1] you must contact the Zentyal Team [2] to request access.
Before starting with the upgrade, we strongly recommend to perform a series of preliminary checks to try to minimize prior checks to try to minimize possible issues. These checks are detailed in the following section.
It is of vital importance to have a backup of the server before proceeding with the upgrade. The upgrade is a complex process and can fail leaving the system damaged or even unrecoverable.
Warning
Please remember that a configuration backup is not a full backup as detailed here [3].
The upgrade script no longer belongs to the zentyal-core package, but is now
located in the repository [4] under the directory extra/zentyal-upgrades/.
The Webmail module is temporarily removed during the Ubuntu upgrade and subsequently reinstalled
after the Zentyal upgrade, in the post-configuration. As a precaution, a backup is created in
/var/lib/zentyal/backup-sogo-upgrade-81.sql. It is important to be aware of this behavior in case any errors occur during the
Ubuntu upgrade, as the module will be uninstalled.
| [1] | Support Portal: https://zentyal.atlassian.net/servicedesk/customer/portal/4/ |
| [2] | Contact: https://zentyal.com/contact-us/ |
| [3] | Configuration backup: https://doc.zentyal.org/en/backup-conf.html |
| [4] | Upgrade script path: https://github.com/zentyal/zentyal/blob/master/extra/zentyal-upgrades/upgrade-8.0-to-8.1.sh |
Pre-upgrade
The following are the actions to be checked before the upgrade.
Zentyal-core package version
In order to upgrade the Zentyal server to version 8.1 we will need to have the version installed 8.0.9 or higher of the zentyal-core package:
dpkg -l zentyal-core
Log errors
One of the most important tasks is to confirm that the most critical system log files are free of errors. The minimum files to check are:
/var/log/zentyal/zentyal.log/var/log/syslog
Disk space
As this is a major upgrade, the minimum required disk size is 3 GB for the / partition and 250 MB for the /boot partition:
df -h
Internet access
In order to download the packages needed to perform the upgrade, the server must have Internet access:
ping -c5 google.com
Access to the repositories
Another critical task to check is the access to Ubuntu and Zentyal repositories. To do so, just run the following command to confirm that there are no errors:
sudo apt update
Available packages
To check if the operating system is up to date, we will have to execute the following commands:
sudo apt update
sudo apt list --upgradable
Broken packages
It is imperative that we check for any broken packages, otherwise, the upgrade will fail.
dpkg -l | egrep -v '^(ii|rc)'
In case of broken packages, the Troubleshooting section [5] explains how to try to fix them.
| [5] | Troubleshooting: https://doc.zentyal.org/en/upgrade.html#id15 |
Database errors
Another important task is to check if there are any errors in the MySQL hosted databases used by Zentyal for its modules:
mysqlcheck -u root -p$(sudo cat /var/lib/zentyal/conf/zentyal-mysql.passwd) \
  --all-databases 2> /dev/null
In case of using the [6] domain controller module, it is also highly recommended to confirm its status:
sudo samba-tool dbcheck --cross-ncs
In case of detecting an error in this last database, we will have to follow [7] this link.
| [6] | Domain Controller: https://doc.zentyal.org/en/directory.html |
| [7] | Documentation on the Samba database: https://wiki.samba.org/index.php/Dbcheck |
System report
Another important action to review is to generate a system report [8] and analyze it carefully to confirm that the system is in a stable state. If any errors are detected, they should be addressed before proceeding with the upgrade.
| [8] | System report: https://doc.zentyal.org/en/smart-admin.html#system-status-reports |
Upgrade
Once we have reviewed your system and confirmed that it is stable, we can proceed with the upgrade. We have two options to carry out the upgrade.
UI
Upgrade the system by clicking on the Upgrade button available on the Webadmin.
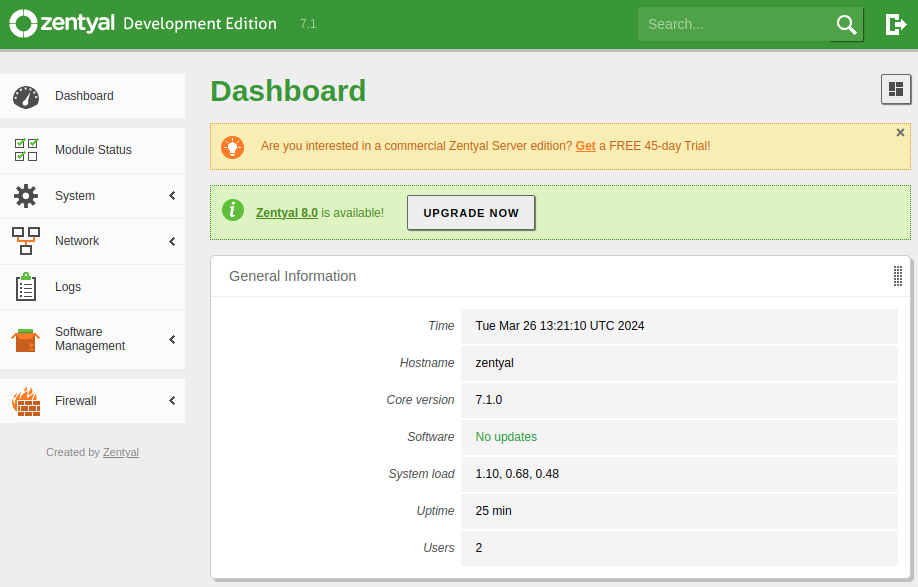
Upgrade button
Warning
If the server does not have an Internet connection, the button will not be displayed.
Once we start the upgrade, we will see the process in a modal window and in the log file /var/log/zentyal/upgrade.log.
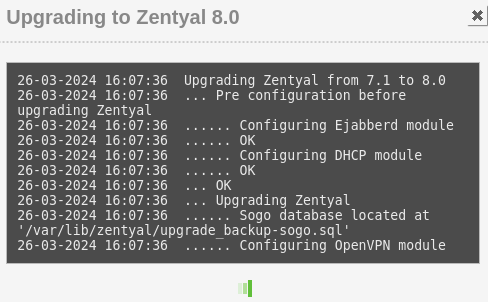
Upgrade in progress
When the upgrade finishes, we should see a success or failure message.
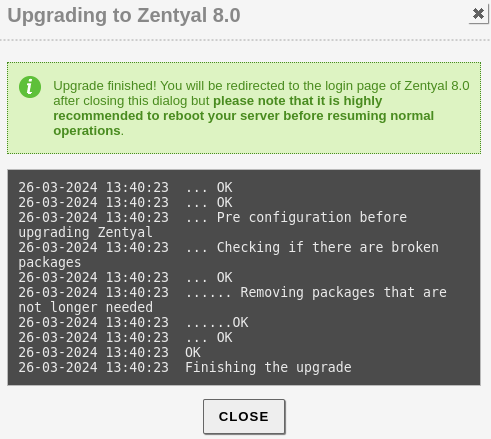
Upgrade finished successfully
Warning
If we do not get any of those messages, the web browser session might have expired, so we will need to check in
the log file /var/log/zentyal/upgrade.log. If the upgrade has finished, just refresh the page.
CLI
From the command line (recommended):
wget https://raw.githubusercontent.com/zentyal/zentyal/refs/heads/master/extra/zentyal-upgrades/upgrade-8.0-to-8.1.sh

# Without debug mode:
sudo bash upgrade-8.0-to-8.1.sh

# With debug mode:
sudo bash -x upgrade-8.0-to-8.1.sh
Warning
The terminal from which the command is being executed cannot be closed until the process has finished.
Tip
A good practice is to store the output generated by the script in a text file in case it is necessary to analyze it in detail.
Post-upgrade
Once the upgrade has finished, we will need to check the following before restarting the server.
1. The Ubuntu version is 24.04:
lsb_release -a
2. The Zentyal packages have been upgraded to 8.1:
dpkg -l | egrep 'zen(tyal|buntu)'
3. There are no broken packages:
dpkg -l | egrep -v '^(ii|rc)'
4. The service apparmor is enabled and active:
systemctl is-enabled apparmor
systemctl is-active apparmor
5. If all of the above is correct, we can proceed to reboot the server.
6. Once it has started, we will analyze the following log files to confirm that no errors have occurred:
/var/log/zentyal/zentyal.log/var/log/syslog.
7. Finally, we will check the operation of each module to make sure that it is stable after the upgrade.
Troubleshooting
In the event that the upgrade has failed, we must identify the point at which the server is before considering restoring a backup.
Current server status
To confirm the status of the server after the failure during the upgrade, first, we must analyze the log file /var/log/zentyal/upgrade.log.
After that, the questions we should ask to determinate if a rollback is needed are:
- 1. Is Ubuntu version still 22.04 and Zentyal packages 8.0?
- If the answer is affirmative and there are no broken packages, there will be no need to restore the backup.
- 2. Has the Ubuntu version been upgraded to something other than 24.04?
- If the answer is affirmative, a backup will have to be restored, since Zentyal 8.1 is based on Ubuntu 24.04.
- 3. Have any Zentyal packages been upgraded?
- If no package was upgraded but Ubuntu was upgraded to 24.04, we can analyze the log file
/var/log/zentyal/upgrade.logand try to run the upgrade script again. - 4. Have Zentyal packages been upgraded to a version other than 8.1?
- If so, you will have to restore the backup.
- 5. Are there broken packages?
- If Ubuntu and Zentyal were upgraded but there are broken packages, we can try to fix them without the need to restore a backup.
Graphical Interface
If after restarting the server we see the following screen when the system starts:

Blank screen after reboot
We will need to execute the following commands to fix it:
sudo /usr/share/zenbuntu/x11-setup
sudo systemctl restart zentyal.lxdm
Tip
To access the command line, you will need to do so via SSH or by pressing Ctrl + Alt + F1 on the server.
Dependency systemd-resolved
The package systemd-resolved is a dependency of Zentyal 8.1 necessary in the network module, so if it has not been installed correctly during the upgrade, there will be errors like the following:
ERROR> Service.pm:43 EBox::Service::manage - No such daemon: systemd-resolved at No such daemon: systemd-resolved at /usr/share/perl5/EBox/Service.pm line 43
EBox::Service::manage('systemd-resolved', 'stop') called at /usr/share/perl5/EBox/Module/Service.pm line 746
To fix this, we need to install the package:
sudo apt install systemd-resolved
And then restart the network module and, if DNS is enabled, it should also be restarted:
sudo zs network restart
sudo zs dns restart
Sogo unavailable
If when trying to use the Sogo module we get the following error:

Service unavailable
We must check the status of the service:
systemctl status sogo
If we see the following error:
libGDLAccess.so.4.9: cannot open shared object file: No such file or directory
We must reinstall the Sogo packages as follows:
sudo systemctl stop sogo
SOGO_PKGS=$(dpkg -l | egrep '^ii.*(sope|sogo)' | egrep -v 'zentyal' | awk '{print $2}')
sudo apt install --reinstall -y $SOGO_PKGS
sudo systemctl restart sogo
Tip
During the upgrade, a backup of the database is made, which
can be found in /var/lib/zentyal/backup-sogo-upgrade-81.sql
Broken packages
If you have broken packages, you can try to fix them with the following commands.
To fix all the packages at once:
sudo dpkg --configure --force-confdef -a
Warning
It may be necessary to run the command multiple times
In case this does not work, you will have to do it package by package:
sudo dpkg --configure --force-confdef name_of_the_package
Database MySQL
If we get errors in the log file /var/log/zentyal/zentyal.log related to the service mysql like the following:
2024/04/26 11:04:02 ERROR> MyDBEngine.pm:200 EBox::MyDBEngine::_connect -
Connection DB Error: Can't connect to local MySQL server through socket
'/var/run/mysqld/mysqld.sock' (2) at Connection DB Error: Can't connect to
local MySQL server through socket '/var/run/mysqld/mysqld.sock' (2)
at /usr/share/perl5/EBox/MyDBEngine.pm line 200
And the service is stopped we must start it:
sudo systemctl status mysql
sudo systemctl start mysql