How to migrate a Zentyal 7.1 server to a Zentyal 8.0 server
In this post, we will explain how to migrate a Zentyal 7.1 server from a Standalone domain controller to a new Zentyal 8.0 server by setting it up as an additional domain controller. The goal is to perform a complete migration from one Zentyal server to another without having to do a fresh installation.
Tip
This guide works for other Zentyal versions as well.
Table of Contents
Considerations
Before migrating our Zentyal server, consider these important guidelines to ensure a correct migration without data loss:
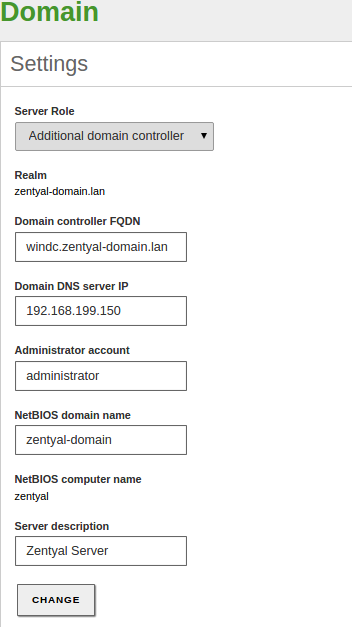
- Initial situation: We begin with the setup described in the how-to of Zentyal as Additional Domain Controller [1] , where we configure a Zentyal 8.0 server as Additional Domain Controller (ADC).
- Exporting and importing data: You must manually export and import personal folders, shared resources, emails, and Group Policies (GPO), as these are not automatically synchronized between servers.
- Email virtual domain: In case of using the mail module [2], configure the same email virtual domain on the Additional Domain Controller as on the original server to maintain mail infrastructure consistency.
- Reconfiguring user home folders: After creating home folders on the new Additional Domain Controller, modify the users’ homeDirectory attribute to point to the new server, ensuring continued access to their data.
- Role change to final Domain Controller: When the current Domain Controller is retired and the Additional Domain Controller becomes the sole controller, the Additional Domain Controller [3] value will remain displayed in the Zentyal administration panel under Domain -> Server role. Do not attempt to change this value. Doing so will trigger a domain re-provisioning, resulting in the loss of all configurations and data.
- Export and import directories: They must be created previously.
| [1] | How-to Zentyal as Additional Domain Controller: https://doc.zentyal.org/en/how-to-adc.html#zentyal-as-additional-domain-controller |
| [2] | Mail module: https://doc.zentyal.org/en/mail.html |
| [3] | Server Role https://doc.zentyal.org/en/_images/join_windows.png |
Lab environment
The test lab environment has the following characteristics:
- Domain → zentyal-domain.lan
- Domain Controller → dc01 (Zentyal 7.1)
- Domain Controller IP → 192.168.6.1
- Additional Domain Controller → dc02 (Zentyal 8.0)
- Additional Domain Controller IP → 192.168.6.2
- Installed modules → Network, Firewall, Logs, NTP, DNS, Domain Controller, Mail, WebMail.
- Client machines → Windows 11 with RSAT tools
- Source directory for exports:
- /mnt/migration/homes
- /mnt/migration/shares
- /mnt/migration/mail/zentyal-domain.lan
- /mnt/migration/gpos/
- Destination directory for imports:
- /home/zenadmin/migration/homes
- /home/zenadmin/migration/shares
- /home/zenadmin/migration/mail/zentyal-domain.lan
- /home/zenadmin/migration/gpos/
Additional settings
- Shared resources → devopsData, administration
- Domain users → sergio, laura, maria
- Virtual mail domain → zentyal-domain.lan
- GPO configured → Control Panel disabled and Denied access to the Run command from the Start Menu.
Data migration
Data migration transfers all information from the old server to the new Additional Domain Controller while ensuring users keep access to their resources and emails. This process requires careful execution to prevent data loss. For large data sets like shared resources, it’s better to split files into smaller portions rather than creating one large compressed file. You can use the split command for this purpose.
The data migration process is detailed below for:
- Personal folders.
- Shared resources.
- Email.
- GPOs.
Personal Folders
Personal folders store important user files and documents. These folders must be properly exported and imported during migration to maintain user access on the new server.
Export: We make a copy of each personal folder preserving the permissions and storing the file in
/mnt/migration/homes/cd /home/ for user in $(ls); do \ tar --exclude='samba' -zcvpf /mnt/migration/homes/$user.tar.gz \ $user/; done ls -l /mnt/migration/homes/
Transfer the copy: We copy the compressed files to the additional domain controller in the directory
/home/zenadmin/migration/homes/scp /mnt/migration/homes/*.tar.gz \ [email protected]:/home/zenadmin/migration/homes/
Import: We proceed to import each personal folder:
cd /home/zenadmin/migration/homes/

for user in $(ls); do tar xzpf $user -C /home/; done

ls -l /home/
Changing the homeDirectory attribute. After the files have been transferred, we update the homeDirectory attribute for each user on the new server to point to the new locations of their home folders.
To get all the entries that have the homeDirectory attribute to modify:
ldbsearch -H /var/lib/samba/private/sam.ldb '(homeDirectory=*)' \
  homeDirectory 2>/dev/null | egrep '^(dn|homeDirectory):'

  dn: CN=dns-DC02,CN=Users,DC=zentyal-domain,DC=lan
  homeDirectory: \\dc01.ZENTYAL-DOMAIN.LAN\dns-DC02

  dn: CN=laura zentyal,CN=Users,DC=zentyal-domain,DC=lan
  homeDirectory: \\dc01.ZENTYAL-DOMAIN.LAN\laura

  dn: CN=maria zentyal,CN=Users,DC=zentyal-domain,DC=lan
  homeDirectory: \\dc01.ZENTYAL-DOMAIN.LAN\maria

  dn: CN=sergio zentyal,CN=Users,DC=zentyal-domain,DC=lan
  homeDirectory: \\dc01.ZENTYAL-DOMAIN.LAN\sergio
As you can see, the entries point to the Domain Controller that we want to remove dc01.
We create an LDIF file that modifies the value of the domain users attribute for the new server:
dn: CN=laura zentyal,CN=Users,DC=zentyal-domain,DC=lan
changetype: modify
replace: homeDirectory
homeDirectory: \\DC02.ZENTYAL-DOMAIN.LAN\laura

dn: CN=maria zentyal,CN=Users,DC=zentyal-domain,DC=lan
changetype: modify
replace: homeDirectory
homeDirectory: \\DC02.ZENTYAL-DOMAIN.LAN\maria

dn: CN=sergio zentyal,CN=Users,DC=zentyal-domain,DC=lan
replace: homeDirectory
homeDirectory: \\DC02.ZENTYAL-DOMAIN.LAN\sergio
We import the generated LDIF file:
ldbmodify -H /var/lib/samba/private/sam.ldb homeDirectory_change.ldif

  Modified 3 records successfully
If your server has a large users number, you can automate creation and import with the following script:
#!/bin/bash

set -e

## Version: 0.1
## Developed by Zentyal Support Team

###
## Global variables
###

## Set the domain controller FQDN in UPPERCASE
DC_FQDN='\\DC02.ZENTYAL-DOMAIN.LAN'
## This directory will be used to store all the files the script generates
LDIF_DIR='/var/lib/zentyal/tmp/LDIF-homeDirectories'
IMPORT=true
CLEAN=false

###
## Functions
###

function clean_dir() {
  /usr/bin/rm -fr ${LDIF_DIR}
}

function requirements() {
 if [[ "$(id -u)" != "0" ]]; then
    /usr/bin/echo "This script must be run as root."
    exit 1
 fi
 if [[ -d "${LDIF_DIR}" ]]; then
    clean_dir
 fi
 /usr/bin/mkdir -m0750 ${LDIF_DIR}
}

function generate_ldif() {
  local USER_DN=${1}
  local USER_NAME=${2}

/usr/bin/cat << EOF > ${LDIF_DIR}/${USER_NAME}.ldif
  dn: ${USER_DN}
  changetype: modify
  replace: homeDirectory
  homeDirectory: ${DC_FQDN}\\${USER_NAME}
  EOF
  }

function get_domain_users() {
  for user in $(/usr/bin/samba-tool user list 2>/dev/null); do
     local USERNAME=${user}
     local USER_INFO=$(/usr/bin/ldbsearch -H /var/lib/samba/private/sam.ldb \
     sAMAccountName="${user}" dn homeDirectory 2>/dev/null \
       | egrep '^(dn|homeDirectory):')

     while IFS= read -r line; do
        if [[ $line =~ ^dn:\ (.+) ]]; then
           DN="${BASH_REMATCH[1]}"
        elif [[ $line =~ ^homeDirectory:\ (.+) ]]; then
           /usr/bin/echo "Generating LDIF for ${USERNAME}..."
           generate_ldif "${DN}" "${USERNAME}"
        fi
     done <<< "$USER_INFO"
  done
}

function import_ldif() {
  cd ${LDIF_DIR}

  for file in $(ls *.ldif); do
     /usr/bin/echo -e "\nImporting '${file}'..."
     /usr/bin/ldbmodify -H /var/lib/samba/private/sam.ldb ${file} 2>/dev/null
     if [[ $? -ne 0 ]]; then
        /usr/bin/echo "The LDIF ${LDIF_PATH} failed..."
        exit 1
     fi
     /usr/bin/echo ""
  done
}

###
## Call functions
###

requirements
get_domain_users

if [[ ${IMPORT} == true ]]; then
      import_ldif
fi

if [[ ${CLEAN} == true ]]; then
      clean_dir
fi
Finally, we verify the changes:
ldbsearch -H /var/lib/samba/private/sam.ldb '(homeDirectory=*)' \
  homeDirectory 2>/dev/null | egrep '^(dn|homeDirectory):'

  dn: CN=dns-DC02,CN=Users,DC=zentyal-domain,DC=lan
  homeDirectory: \\DC02.ZENTYAL-DOMAIN.LAN\dns-DC02

  dn: CN=laura zentyal,CN=Users,DC=zentyal-domain,DC=lan
  homeDirectory: \\DC02.ZENTYAL-DOMAIN.LAN\laura

  dn: CN=maria zentyal,CN=Users,DC=zentyal-domain,DC=lan
  homeDirectory: \\DC02.ZENTYAL-DOMAIN.LAN\maria

  dn: CN=sergio zentyal,CN=Users,DC=zentyal-domain,DC=lan
  homeDirectory: \\DC02.ZENTYAL-DOMAIN.LAN\sergio
Shared resources
To maintain uninterrupted user access, shared resources must be migrated. Since each folder structure needs to be rebuilt in Zentyal’s designated shared resource location on the new server, we recommend migrating one resource at a time.
Export: We make a copy of each shared resource preserving the permissions by means of a simple loop to the directory
/mnt/migration/shares/cd /home/samba/shares/ for share in $(ls); do \ cd $share && tar -czvf /mnt/migration/shares/$share.tar.gz . && cd ../; done ls -l /mnt/migration/shares/
Transfer data: We copy the compressed files to the additional domain controller in the directory
/home/zenadmin/migration/shares/scp /mnt/migration/shares/*.tar.gz \ [email protected]:/home/zenadmin/migration/shares/
Now we proceed to create from the Zentyal Administration Panel File Sharing -> Shared Directories the shared resources on the new server.
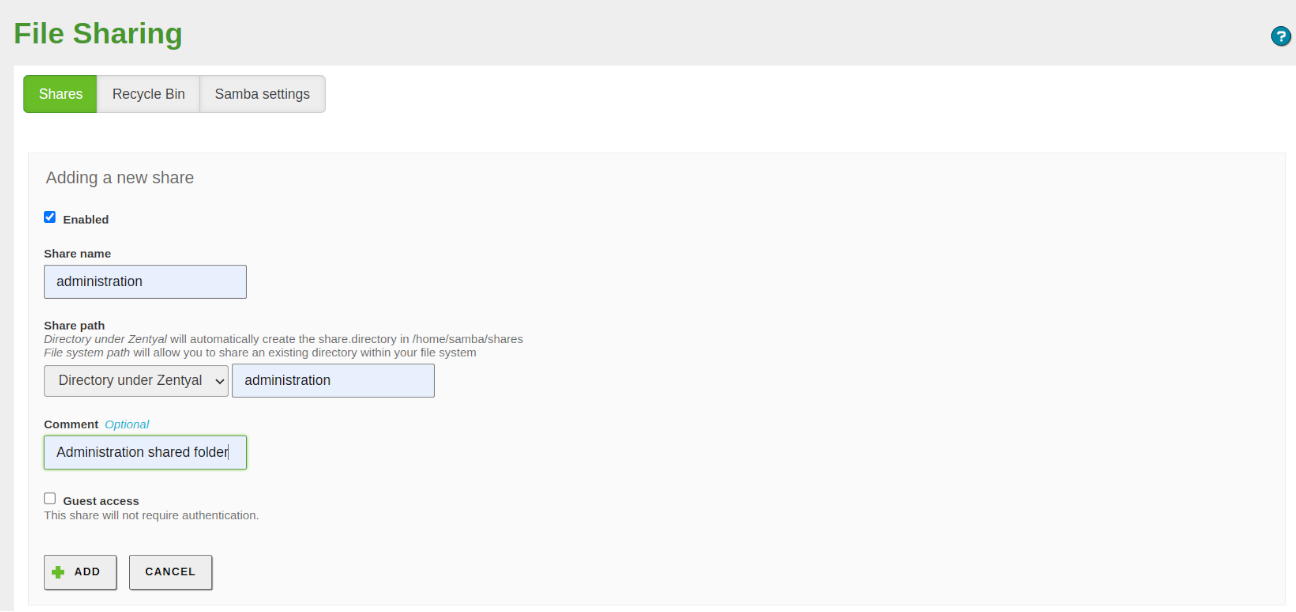
Creating the Share
Import: We proceed to import each shared resource:
cd /home/zenadmin/migration/shares/

for share in $(ls); do \
  tar -xpvf $share -C /home/samba/shares/${share%.tar.gz}/; done

ls -lR /home/samba/shares/
Permissions We configure the ACLs from the Zentyal Administration Panel that you want each shared resource to have.
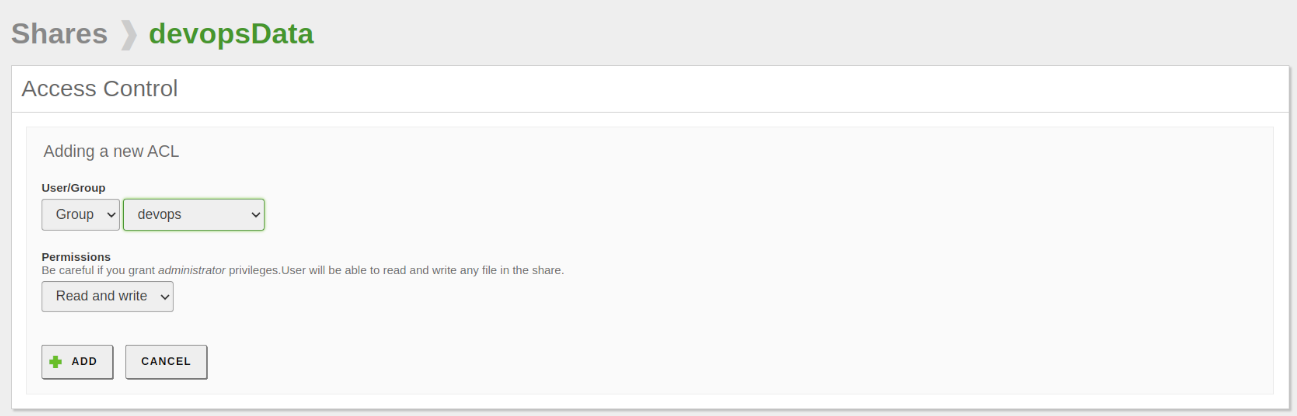
Configuring ACLs
Emails
If you use and want to migrate the [4] Mail module in Zentyal, the emails from virtual domains are stored in /var/vmail/<domain name>. Within this location, there is a folder for each user of the domain. As indicated in the Considerations section, before joining the new Zentyal server, it is necessary to have created a virtual email domain with the same name as the one configured on the original server.
Export: We make a copy of all mailboxes located in /var/vmail/zentyal-domain.lan using a simple loop, the files will be stored in
/mnt/migration/mail/zentyal-domain.lan/cd /var/vmail/zentyal-domain.lan/ for mailbox in $(ls); do \ tar -zcpvf /mnt/migration/mail/zentyal-domain.lan/$mailbox.tar.gz \ $mailbox; done ls -l /mnt/migration/mail/zentyal-domain.lan/
Transfer the copy: We copy the compressed files to the additional domain controller in the directory
/home/zenadmin/migration/mail/zentyal-domain.lan/scp /mnt/migration/mail/zentyal-domain.lan/*.tar.gz \ [email protected]:migration/mail/zentyal-domain.lan/
Creating the virtual mail domain directory: We create the virtual mail domain directory that will contain the mailboxes:
mkdir -p /var/vmail/zentyal-domain.lan
chmod 2775 /var/mail/
chown -R ebox:ebox /var/vmail/
Import: We proceed to import each mailbox:
cd /home/zenadmin/migration/mail/zentyal-domain.lan/

for mailbox in $(ls); do \
  tar -zpxvf $mailbox -C /var/vmail/zentyal-domain.lan/; done

ls -l /var/vmail/zentyal-domain.lan/
| [4] | https://doc.zentyal.org/es/mail.html |
GPOs
To migrate the domain’s Group Policies, it is as simple as copying the directory /var/lib/samba/sysvol/zentyal-domain.lan/, which contains the directories Policies and scripts
Export: We make the copy and store it in
/mnt/migration/gpos/:cd /var/lib/samba/sysvol/zentyal-domain.lan/ tar -zcpvf /mnt/migration/gpos/sysvol.tar.gz . ls -l /mnt/migration/gpos/
Transfer: Copy the compressed file to the additional domain controller in the directory
/home/zenadmin/migration/gpos/scp /mnt/migration/gpos/sysvol.tar.gz \ [email protected]:/home/zenadmin/migration/gpos
Import: Proceed to import the GPOs:
rm -rf /var/lib/samba/sysvol/zentyal-domain.lan/*

tar -xzvf /home/zenadmin/migration/gpos/sysvol.tar.gz \
 -C /var/lib/samba/sysvol/zentyal-domain.lan

ls -lR /var/lib/samba/sysvol/zentyal-domain.lan/
Migrating FSMO roles
Once we have all the data imported, we will proceed to transfer the FSMO roles [5] to the new domain controller.
Warning
This step can cause loss of service, it is recommended to make a backup on each server.
Warning
If you want to migrate the mail service, you will have to disable it on the additional domain controller before performing the actions in this section.
Tip
FSMO role transfer is a critical process where certain key functions are distributed among domain controllers (DCs). Although all DCs in a domain can handle most tasks, some specific roles must be centralized to ensure consistency and avoid conflicts. There are two main options to perform the transfer of FSMO roles, online and offline
Verification: We check that the owner of the FSMO roles is the server dc01, which we want to migrate:
samba-tool fsmo show

SchemaMasterRole owner: CN=NTDS Settings,CN=DC01,CN=Servers,
CN=Default-First-Site-Name,CN=Sites,CN=Configuration,DC=zentyal-domain,DC=lan

InfrastructureMasterRole owner: CN=NTDS Settings,CN=DC01,CN=Servers,
CN=Default-First-Site-Name,CN=Sites,CN=Configuration,DC=zentyal-domain,DC=lan

RidAllocationMasterRole owner: CN=NTDS Settings,CN=DC01,CN=Servers,
CN=Default-First-Site-Name,CN=Sites,CN=Configuration,DC=zentyal-domain,DC=lan

PdcEmulationMasterRole owner: CN=NTDS Settings,CN=DC01,CN=Servers,
CN=Default-First-Site-Name,CN=Sites,CN=Configuration,DC=zentyal-domain,DC=lan

DomainNamingMasterRole owner: CN=NTDS Settings,CN=DC01,CN=Servers,
CN=Default-First-Site-Name,CN=Sites,CN=Configuration,DC=zentyal-domain,DC=lan

DomainDnsZonesMasterRole owner: CN=NTDS Settings,CN=DC01,CN=Servers,
CN=Default-First-Site-Name,CN=Sites,CN=Configuration,DC=zentyal-domain,DC=lan

ForestDnsZonesMasterRole owner: CN=NTDS Settings,CN=DC01,CN=Servers,
CN=Default-First-Site-Name,CN=Sites,CN=Configuration,DC=zentyal-domain,DC=lan
Partial migration: We run the ad-migrate script to migrate 5 of the 7 FSMO roles:
/usr/share/zentyal-samba/ad-migrate

  WARNING: This script will transfer all FSMO roles from the current owners to
  the local server.
  After all roles have been successfully transferred, you can shutdown
  the other domain controllers.
  Do you want to continue [Y/n]? AND

  Checking server mod...

  Checking if server is provisioned...

  Transferring FSMO roles...
  Transferring Schema Master role from owner: CN=NTDS Settings,CN=DC01,
  CN=Servers,CN=Default-First-Site-Name,CN=Sites,CN=Configuration,
  DC=zentyal-domain,DC=lan
  Current owner seems to be offline. Seize the role [Y/n]? AND
  Transferring Domain Naming Master role from owner: CN=NTDS Settings,
  CN=DC01,CN=Servers,CN=Default-First-Site-Name,CN=Sites,CN=Configuration,
  DC=zentyal-domain,DC=lan
  Current owner seems to be offline. Seize the role [Y/n]? AND
  Transferring PDC Emulation Master role from owner: CN=NTDS Settings,
  CN=DC01,CN=Servers,CN=Default-First-Site-Name,CN=Sites,CN=Configuration,
  DC=zentyal-domain,DC=lan
  Current owner seems to be offline. Seize the role [Y/n]? AND
  Transferring RID Allocation Master role from owner: CN=NTDS Settings,
  CN=DC01,CN=Servers,CN=Default-First-Site-Name,CN=Sites,CN=Configuration,
  DC=zentyal-domain,DC=lan
  Current owner seems to be offline. Seize the role [Y/n]? AND
  Transferring Infrastructure Master role from owner: CN=NTDS Settings,
  CN=DC01,CN=Servers,CN=Default-First-Site-Name,CN=Sites,CN=Configuration,
  DC=zentyal-domain,DC=lan
  Current owner seems to be offline. Seize the role [Y/n]? AND
  Migrated successfully!
Verification: We verify that the 5 mentioned roles have been transferred:
samba-tool fsmo show

 SchemaMasterRole owner: CN=NTDS Settings,CN=DC02,CN=Servers,
 CN=Default-First-Site-Name,CN=Sites,CN=Configuration,DC=zentyal-domain,DC=lan
 InfrastructureMasterRole owner: CN=NTDS Settings,CN=DC02,CN=Servers,
 CN=Default-First-Site-Name,CN=Sites,CN=Configuration,DC=zentyal-domain,DC=lan
 RidAllocationMasterRole owner: CN=NTDS Settings,CN=DC02,CN=Servers,
 CN=Default-First-Site-Name,CN=Sites,CN=Configuration,DC=zentyal-domain,DC=lan
 PdcEmulationMasterRole owner: CN=NTDS Settings,CN=DC02,CN=Servers,
 CN=Default-First-Site-Name,CN=Sites,CN=Configuration,DC=zentyal-domain,DC=lan
 DomainNamingMasterRole owner: CN=NTDS Settings,CN=DC02,CN=Servers,
 CN=Default-First-Site-Name,CN=Sites,CN=Configuration,DC=zentyal-domain,DC=lan
 DomainDnsZonesMasterRole owner: CN=NTDS Settings,CN=DC01,CN=Servers,
 CN=Default-First-Site-Name,CN=Sites,CN=Configuration,DC=zentyal-domain,DC=lan
 ForestDnsZonesMasterRole owner: CN=NTDS Settings,CN=DC01,CN=Servers,
 CN=Default-First-Site-Name,CN=Sites,CN=Configuration,DC=zentyal-domain,DC=lan
Migration remaining: We proceed to migrate the last two missing roles using the same mode used by the script:
For the online version, the script will have shown Transferring..., so we will have to execute the following commands:
samba-tool fsmo transfer --role=domaindns -UAdministrator

 lpcfg_load: refreshing parameters from /etc/samba/smb.conf
 resolve_lmhosts: Attempting lmhosts lookup for name
 f533a844-ce64-407e-bea8-ba8907e6e201._msdcs.zentyal-domain.lan
 Password for [ZENTYAL-DOMAIN\Administrator]:
 Using binding ncacn_ip_tcp:dc02.zentyal-domain.lan[,seal]
 resolve_lmhosts: Attempting lmhosts lookup for name dc02.zentyal-domain.lan
 resolve_lmhosts: Attempting lmhosts lookup for name dc02.zentyal-domain.lan
 FSMO transfer of 'domaindns' role successful

samba-tool fsmo transfer --role=forestdns -UAdministrator

 lpcfg_load: refreshing parameters from /etc/samba/smb.conf
 resolve_lmhosts: Attempting lmhosts lookup for name
 f533a844-ce64-407e-bea8-ba8907e6e201._msdcs.zentyal-domain.lan
 Password for [ZENTYAL-DOMAIN\Administrator]:
 Using binding ncacn_ip_tcp:dc02.zentyal-domain.lan[,seal]
 resolve_lmhosts: Attempting lmhosts lookup for name dc02.zentyal-domain.lan
 resolve_lmhosts: Attempting lmhosts lookup for name dc02.zentyal-domain.lan
 FSMO transfer of 'forestdns' role successful
Otherwise, we will use seizing:
samba-tool fsmo seize --role=domaindns --role=forestdns -UAdministrator

 Attempting transfer...
 lpcfg_load: refreshing parameters from /etc/samba/smb.conf
 resolve_lmhosts: Attempting lmhosts lookup for name
 f533a844-ce64-407e-bea8-ba8907e6e201._msdcs.zentyal-domain.lan
 Failed to connect to ldap URL
 'ldap://f533a844-ce64-407e-bea8-ba8907e6e201._msdcs.zentyal-domain.lan'
 - LDAP client internal error: NT_STATUS_HOST_UNREACHABLE
 Failed to connect to
 'ldap://f533a844-ce64-407e-bea8-ba8907e6e201._msdcs.zentyal-domain.lan'
 with backend 'ldap': LDAP client internal error: NT_STATUS_HOST_UNREACHABLE
 Transfer unsuccessful, seizing...
 Seizing domaindns FSMO role...
 FSMO seize of 'domaindns' role successful

samba-tool fsmo seize --role=forestdns --role=forestdns -UAdministrator

 Attempting transfer...
 lpcfg_load: refreshing parameters from /etc/samba/smb.conf
 resolve_lmhosts: Attempting lmhosts lookup for name
 f533a844-ce64-407e-bea8-ba8907e6e201._msdcs.zentyal-domain.lan
 Failed to connect to ldap URL
 'ldap://f533a844-ce64-407e-bea8-ba8907e6e201._msdcs.zentyal-domain.lan'
 - LDAP client internal error: NT_STATUS_HOST_UNREACHABLE
 Failed to connect to
 'ldap://f533a844-ce64-407e-bea8-ba8907e6e201._msdcs.zentyal-domain.lan'
 with backend 'ldap': LDAP client internal error: NT_STATUS_HOST_UNREACHABLE
 Transfer unsuccessful, seizing...
 Seizing forestdns FSMO role...
 FSMO seize of 'forestdns' role successful
Verification: We check that all roles have been migrated:
samba-tool fsmo show

 SchemaMasterRole owner: CN=NTDS Settings,CN=DC02,CN=Servers,
 CN=Default-First-Site-Name,CN=Sites,CN=Configuration,DC=zentyal-domain,DC=lan
 InfrastructureMasterRole owner: CN=NTDS Settings,CN=DC02,CN=Servers,
 CN=Default-First-Site-Name,CN=Sites,CN=Configuration,DC=zentyal-domain,DC=lan
 RidAllocationMasterRole owner: CN=NTDS Settings,CN=DC02,CN=Servers,
 CN=Default-First-Site-Name,CN=Sites,CN=Configuration,DC=zentyal-domain,DC=lan
 PdcEmulationMasterRole owner: CN=NTDS Settings,CN=DC02,CN=Servers,
 CN=Default-First-Site-Name,CN=Sites,CN=Configuration,DC=zentyal-domain,DC=lan
 DomainNamingMasterRole owner: CN=NTDS Settings,CN=DC02,CN=Servers,
 CN=Default-First-Site-Name,CN=Sites,CN=Configuration,DC=zentyal-domain,DC=lan
 DomainDnsZonesMasterRole owner: CN=NTDS Settings,CN=DC02,CN=Servers,
 CN=Default-First-Site-Name,CN=Sites,CN=Configuration,DC=zentyal-domain,DC=lan
 ForestDnsZonesMasterRole owner: CN=NTDS Settings,CN=DC02,CN=Servers,
 CN=Default-First-Site-Name,CN=Sites,CN=Configuration,DC=zentyal-domain,DC=lan
| [5] | Transferring and Seizing FSMO Roles: https://wiki.samba.org/index.php/Transferring_and_Seizing_FSMO_Roles |
| [6] | Total migration: https://doc.zentyal.org/en/directory.html#total-migration |
We enable the mail and webmail modules
Once the FSMO roles have been transferred, we proceed to enable the Mail module to check that users can access their emails. Below is an image using the webmail module [6]
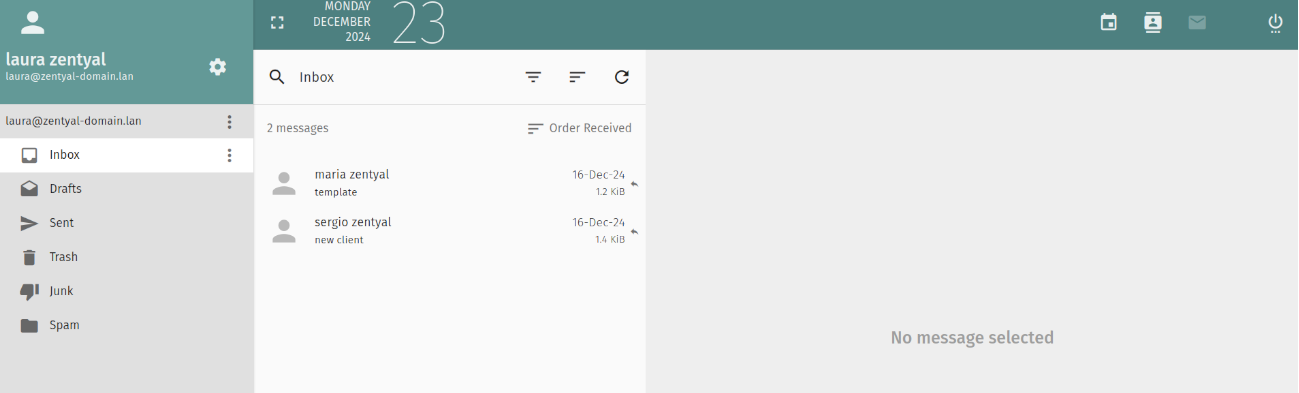
Access to the mailbox.
| [7] | Módulo webmail: https://doc.zentyal.org/en/mail.html#webmail |
Disconnecting the server to migrate
At this point, we will proceed to disconnect the server we want to migrate and remove (dc01) from the network in a controlled manner. The objective is to evaluate the capacity of the new server (dc02) to correctly assume the domain functions as Domain Controller. This procedure will allow to verify the correct access of the users to their resources and the continuity of the essential services of the domain.
Warning
This step may cause loss of service.
We disconnect or isolate the server dc01.
We eliminate the DNS records on the server dc02 related to dc01 for the domain and NS.
- Deletion of the NS record associated with DC01: This change ensures that dc01 is not referenced as an authoritative server for the domain zone.
- Deletion of the A record associated with DC01: We are deleting this record to avoid erroneous resolutions that may impact the operation of the domain.
These actions are intended to guarantee the continuity of the service and the correct resolution of names while the transition to dc02 is validated.
Warning
During the server disconnection process, it is important to note that the dc02 will attempt to maintain communication with the disconnected domain controller, this will generate a significant volume of messages in the log files: /var/log/syslog and /var/log/samba/samba.log, indicating failed attempts to connect or synchronize with the dc01.
These logs are expected and do not represent a critical problem. However, it is recommended to monitor the log files to identify any anomalous behavior that is not related to the planned disconnection.
Testing on clients
With the environment almost completely migrated, we proceed to perform tests on the clients to verify that the modules are working correctly, and that users can access their information.
First of all, it is imperative that we verify and modify, if necessary, the network configuration related to the DNS server and the gateway of the clients so that they point to the IP of the new server dc02.
User login. The first thing we will do is verify that the domain users can log in. To do this, we log in with a user on a Windows client.
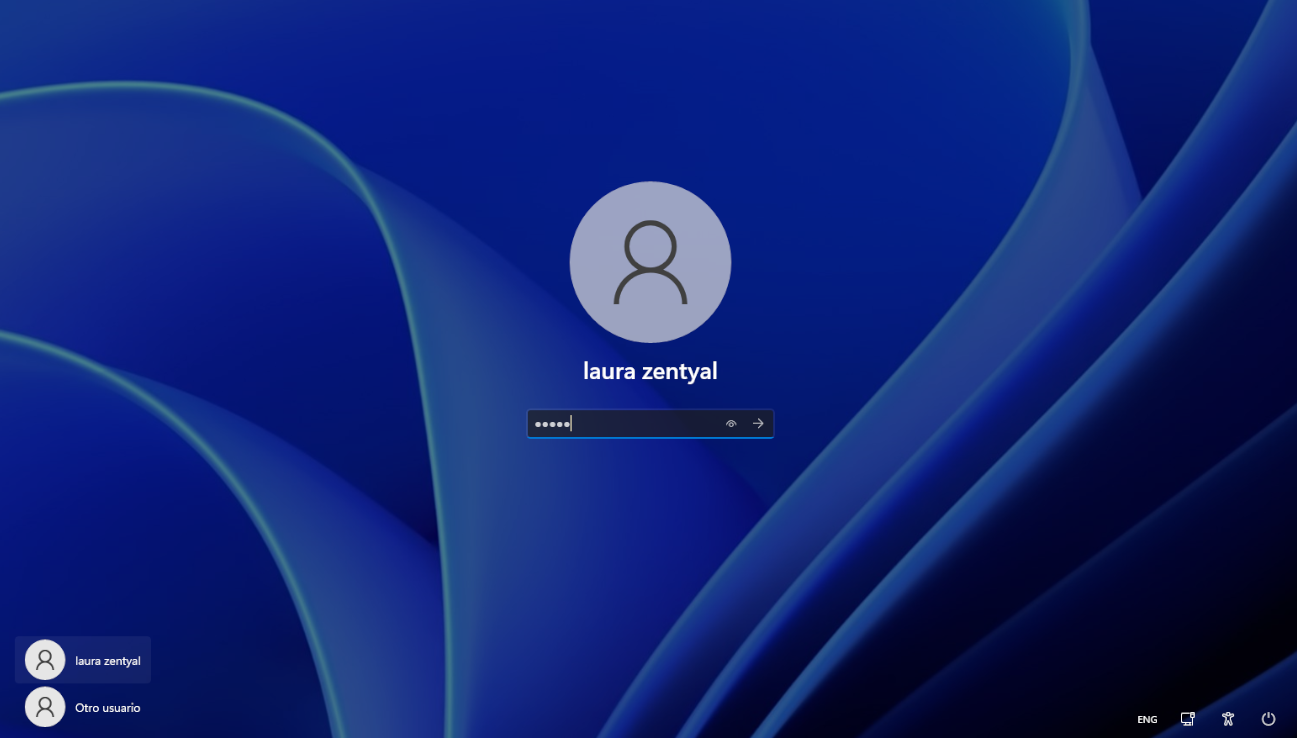
User login
Access to personal folders and shared resources We check that we have access to the user’s personal folder.
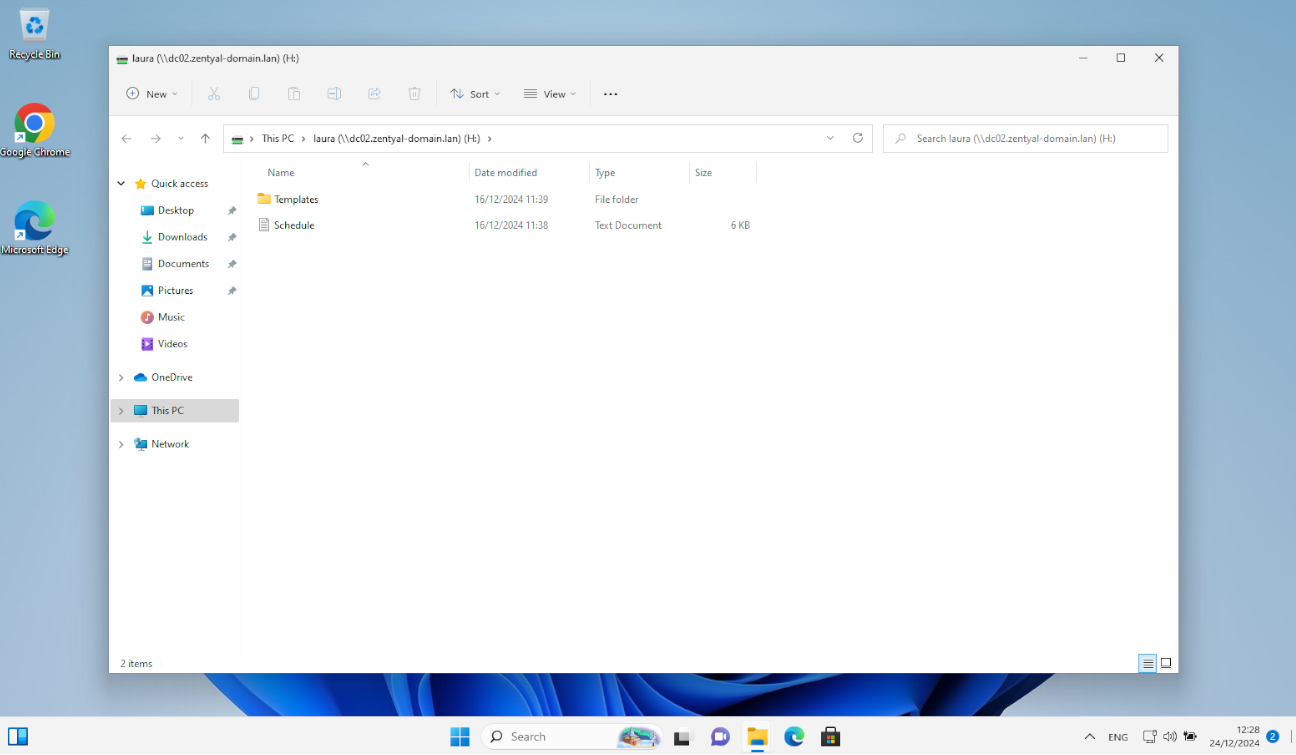
Personal folder access
Acceso a los recursos compartidos: We check that we have access to the shared folders.
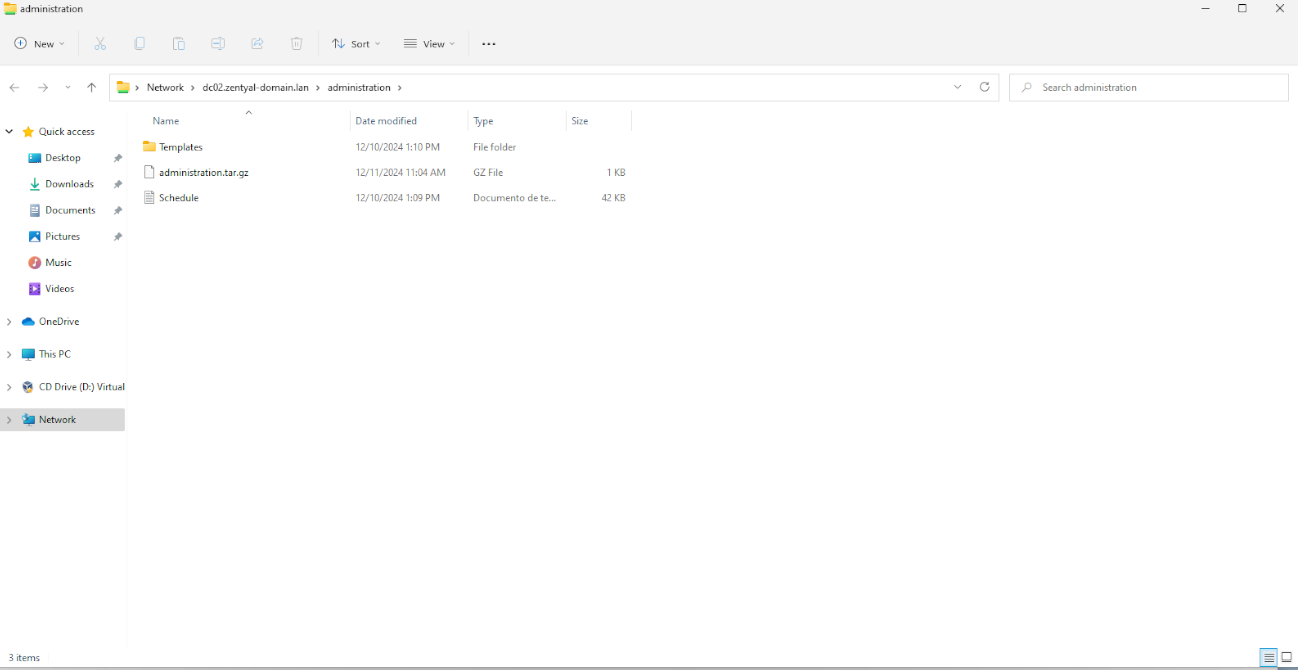
Access to the shared resource
Application of GPOs. We log on to the Windows client with any domain user and check if the GPO that blocks access to the run command from the Start Menu is applied.
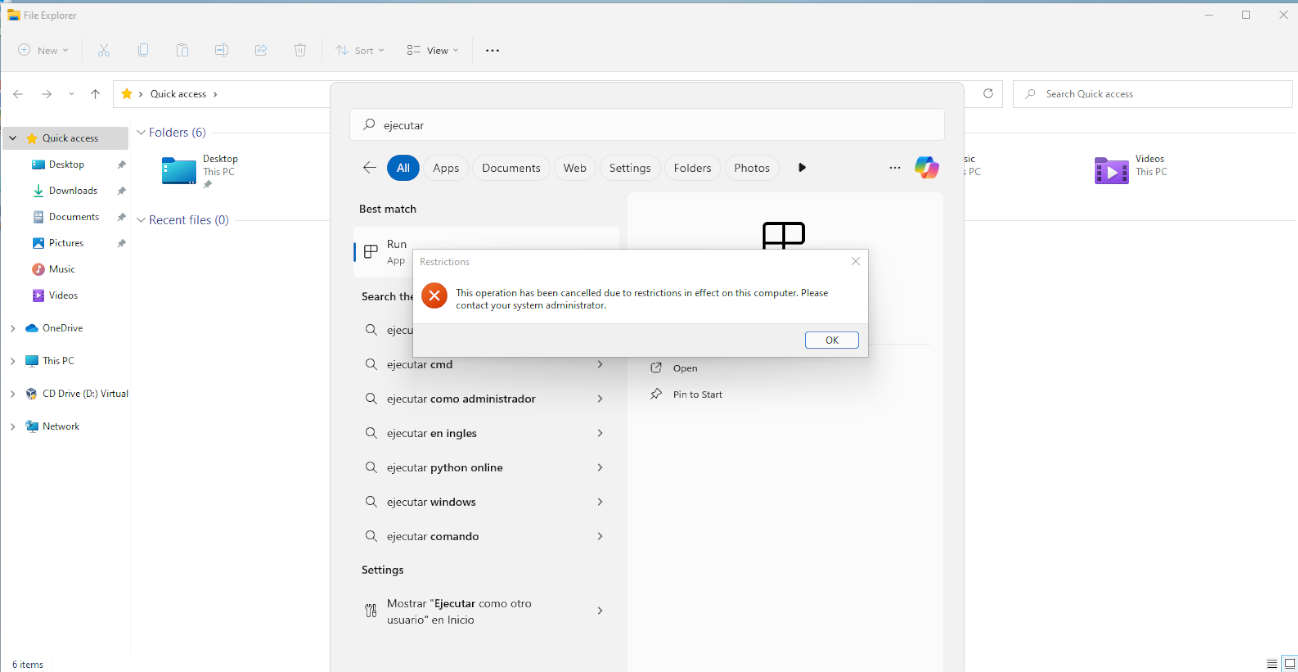
Applying Group Policy.
Deleting a Domain Controller
As a final step, we will proceed to demote (delete) the domain controller dc01, so that there is no trace of it in the domain.
Tip
Demoting a domain controller consists of removing its domain controller role within an Active Directory (AD) environment. This implies that the server will no longer participate in the replication of domain data and will no longer manage related services such as authentication, authorization, DNS name service, and Group Policy (GPO).
As indicated in the official Samba documentation [7], this process can be performed online or offline. In our case, we take advantage of the fact that dc01 is disconnected from the network to perform tests and we proceed to demote it offline.
Demote: We proceed to delete the server using offline mode:
samba-tool domain demote --remove-other-dead-server=dc01

 INFO 2024-12-14 03:22:59,871 pid:16821
 /usr/lib/python3/dist-packages/samba/remove_dc.py
 #337: Removing nTDSConnection: CN=dfe89416-f8ce-415e-b333-33942a6adaba,
 CN=NTDS Settings,CN=DC02,CN=Servers,CN=Default-First-Site-Name,
 CN=Sites,CN=Configuration,DC=zentyal-domain,DC=lan
 INFO 2024-12-14 03:22:59,879 pid:16821
 /usr/lib/python3/dist-packages/samba/remove_dc.py
 #359: Removing nTDSDSA: CN=NTDS Settings,CN=DC01,CN=Serve
 rs,CN=Default-First-Site-Name,CN=Sites,CN=Configuration,
 DC=zentyal-domain,DC=lan (and any children)
 INFO 2024-12-14 03:22:59,901 pid:16821
 /usr/lib/python3/dist-packages/samba/remove_dc.py
 #258: Removing RID Set: CN=RID Set,CN=DC01,
 OU=Domain Controllers,DC=zentyal-domain,DC=lan
 INFO 2024-12-14 03:22:59,906 pid:16821
 /usr/lib/python3/dist-packages/samba/remove_dc.py
 #267: Removing computer account: CN=DC01,OU=Domain Controllers,
 DC=zentyal-domain,DC=lan (and any child objects)
 INFO 2024-12-14 03:22:59,912 pid:16821
 /usr/lib/python3/dist-packages/samba/remove_dc.py
 #279: Removing Samba-specific DNS service account: CN=dns-dc
 01,CN=Users,DC=zentyal-domain,DC=lan
 INFO 2024-12-14 03:22:59,920 pid:16821
 /usr/lib/python3/dist-packages/samba/remove_dc.py
 #56: Removing Sysvol reference: CN=DC01,CN=Enterprise,CN=Microso
 ft System Volumes,CN=System,CN=Configuration,DC=zentyal-domain,DC=lan
 INFO 2024-12-14 03:22:59,921 pid:16821
 /usr/lib/python3/dist-packages/samba/remove_dc.py
 #56: Removing Sysvol reference: CN=DC01,CN=zentyal-domain.l
 an,CN=Microsoft System Volumes,CN=System,CN=Configuration,DC=zentyal-domain,
 DC=lan
 INFO 2024-12-14 03:22:59,921 pid:16821
 /usr/lib/python3/dist-packages/samba/remove_dc.py
 #80: Removing Sysvol reference: CN=DC01,CN=Domain System Volum
 es (SYSVOL share),CN=File Replication Service,CN=System,DC=zentyal-domain,
 DC=lan
 INFO 2024-12-14 03:22:59,921 pid:16821
 /usr/lib/python3/dist-packages/samba/remove_dc.py
 #80: Removing Sysvol reference: CN=DC01,CN=Topology,CN=Doma
 in System Volume,CN=DFSR-GlobalSettings,CN=System,DC=zentyal-domain,
 DC=lan
Verification: We check from the Zentyal Administration Panel of the server dc02 that the old dc01 is no longer present in Domain Controllers.
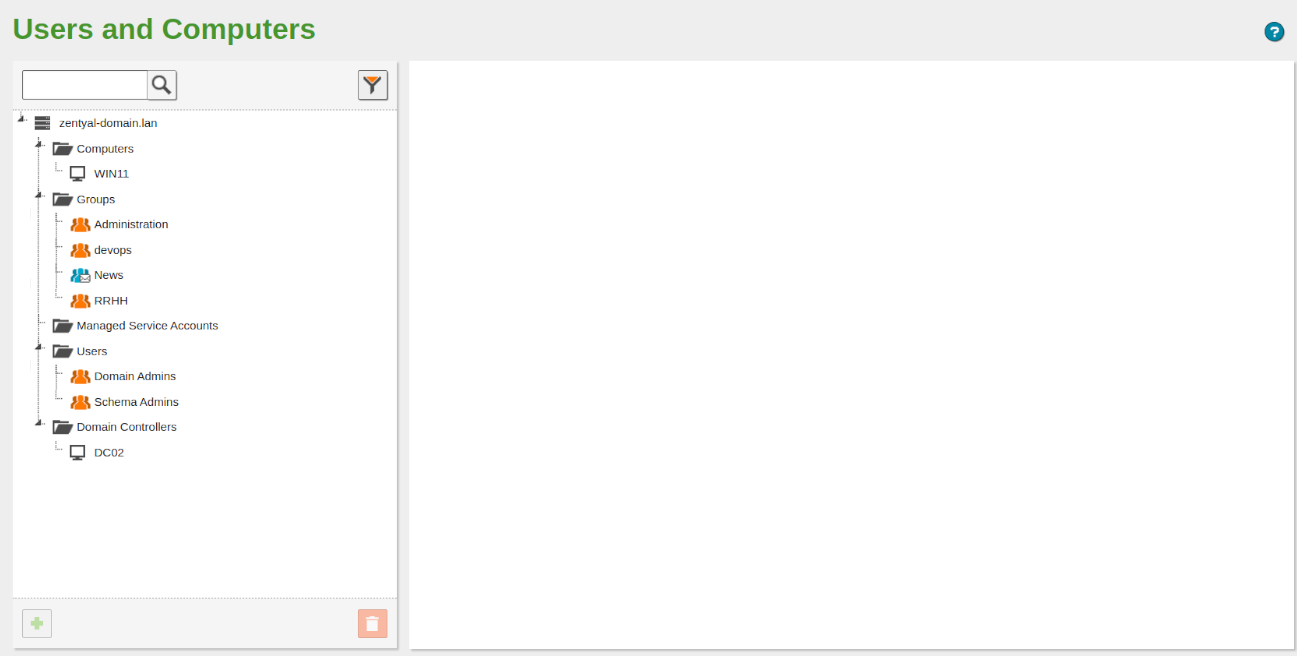
Old demoted dc01.
CNAME record: Once the server has been demoted, it is highly recommended to create an alias (CNAME record) [8] from the DNS module for the dc02 A record, so that it can also resolve to the old DNS record dc01, this will allow us to prevent possible incidents such as applications that still use the DNS record of the old server dc01.
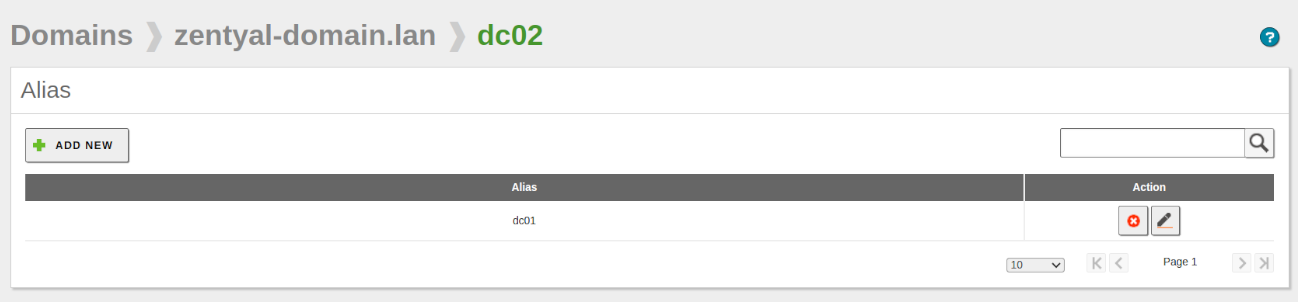
Creating alias to dc01
| [8] | Total migration: https://wiki.samba.org/index.php/Demoting_a_Samba_AD_DC |